Risk Management
SpiraPlan includes an enterprise risk management system that is fully integrated with the requirements and project management features of SpiraPlan. The risk management module lets you identify, analyze, treat, and monitor risks with support for risks, mitigations, tasks and risk cubes.
Risk Management in SpiraPlan
With SpiraPlan you can easily identify, capture and manage project and program risks with an easy to use web interface. Risks are a unique artifact within SpiraPlan (separate from issues or defects) that have their own types (business, technical, schedule, etc.), attributes and workflows.
Risks have special attributes for analyzing and categorizing how important they are:
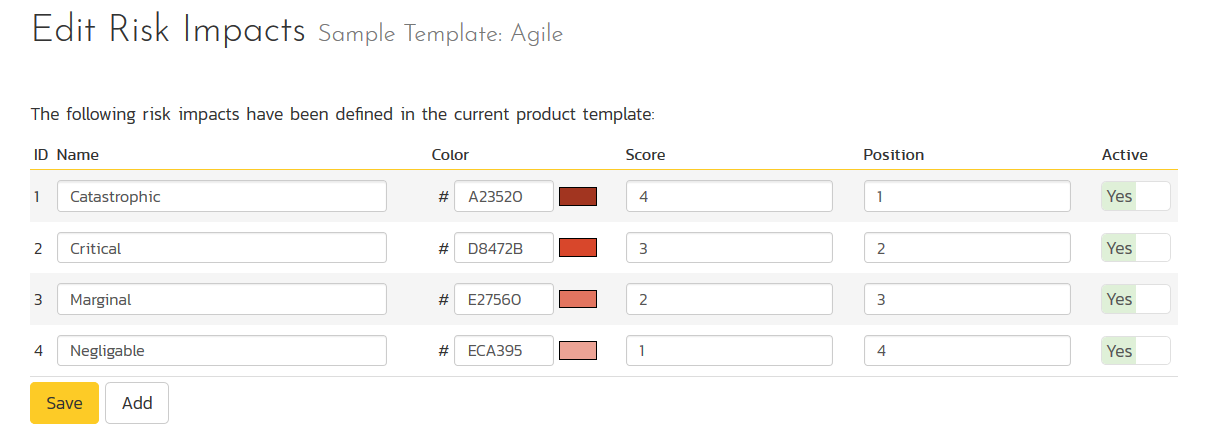
- Probability - how likely it will be that the risk will happen. Each one has a color and weighting (called a Score) associated with it.
- Impact - how serious it will be if the risk happens. Each one has a color and weighting (called a Score) associated with it.
- Exposure - calculated by multiplying the Score of the Probability X Impact to give an overall value of how serious the risk is, adjusted for how likely it is.
This means that risks that are likely to happen with serious consequences will appear higher up in the lists than risks that are less likely to happen and/or have less serious consequences.
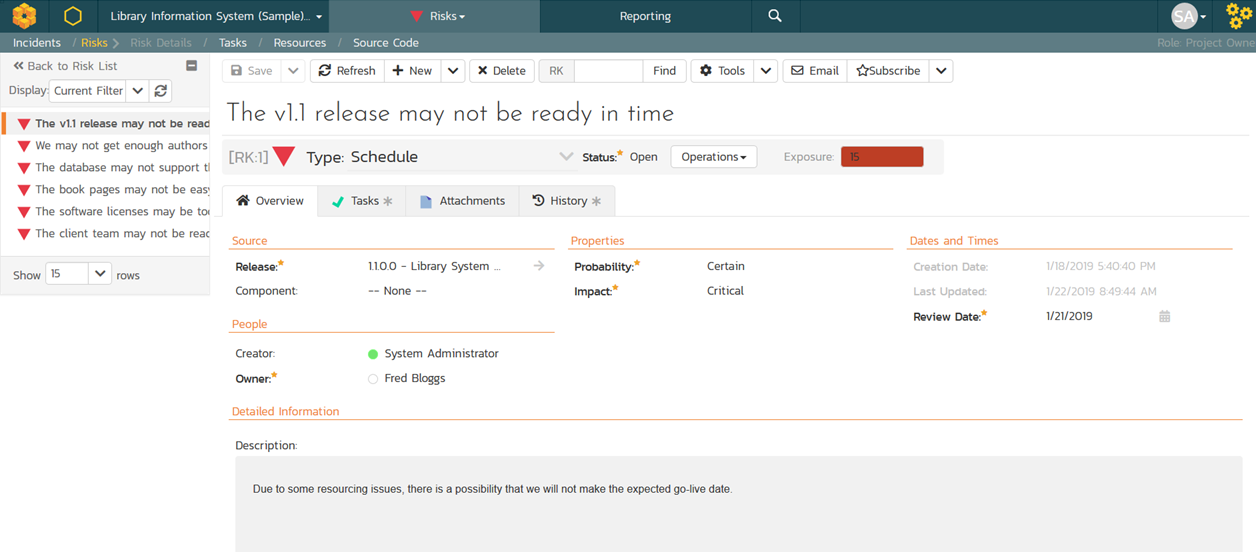
Each Risk will have their own "details page" similar to the other artifacts, where you can assign the Risk to an Owner, associate with a Release and/or Component, as well have various other standard and custom fields:
One important field for Risks is the Review Date since Risks can change in impact or probability during the lifespan of a project and need to be constantly reviewed.
The risk probabilities and impacts can of course be customized by a project template administrator:
Risk Management Process
A standard risk management workflow typically has the following five phases:
- Step 1: Identify the Risk. You and your team uncover, recognize and describe risks that might affect your project or its outcomes. There are a number of techniques you can use to find project risks. During this step you start to prepare your Project Risk Register.
- Step 2: Analyze the risk. Once risks are identified you determine the likelihood and consequence of each risk. You develop an understanding of the nature of the risk and its potential to affect project goals and objectives. This information is also input to your Project Risk Register.
- Step 3: Evaluate or Rank the Risk. You evaluate or rank the risk by determining the risk magnitude, which is the combination of likelihood and consequence. You make decisions about whether the risk is acceptable or whether it is serious enough to warrant treatment. These risk rankings are also added to your Project Risk Register.
- Step 4: Treat the Risk. This is also referred to as Risk Response Planning. During this step you assess your highest ranked risks and set out a plan to treat or modify these risks to achieve acceptable risk levels. How can you minimize the probability of the negative risks as well as enhancing the opportunities? You create risk mitigation strategies, preventive plans and contingency plans in this step. And you add the risk treatment measures for the highest ranking or most serious risks to your Project Risk Register.
- Step 5: Monitor and Review the risk. This is the step where you take your Project Risk Register and use it to monitor, track and review risks.
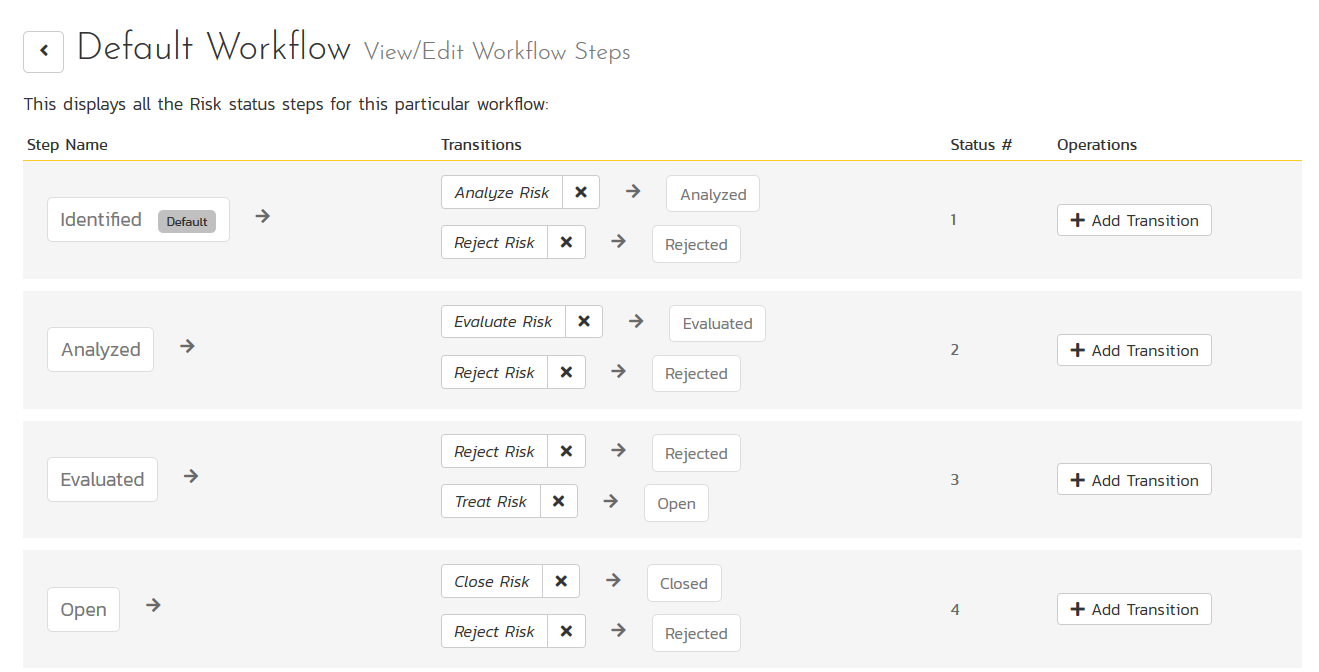
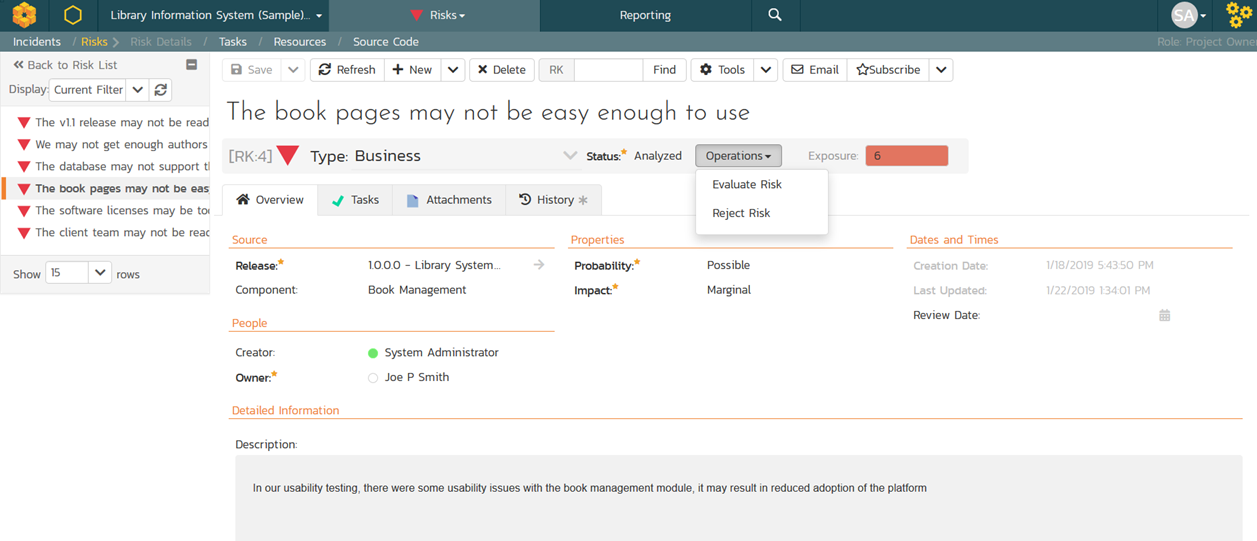
Accordingly, the default workflow for a risk in SpiraPlan has been created to implement these best practices out of the box:
As with all artifacts in SpiraPlan, you will be able to customize the steps, transitions (actions) and permissions associated with risk workflows, as well as specify which fields are required, hidden or disabled at each workflow state.
Risk Mitigations
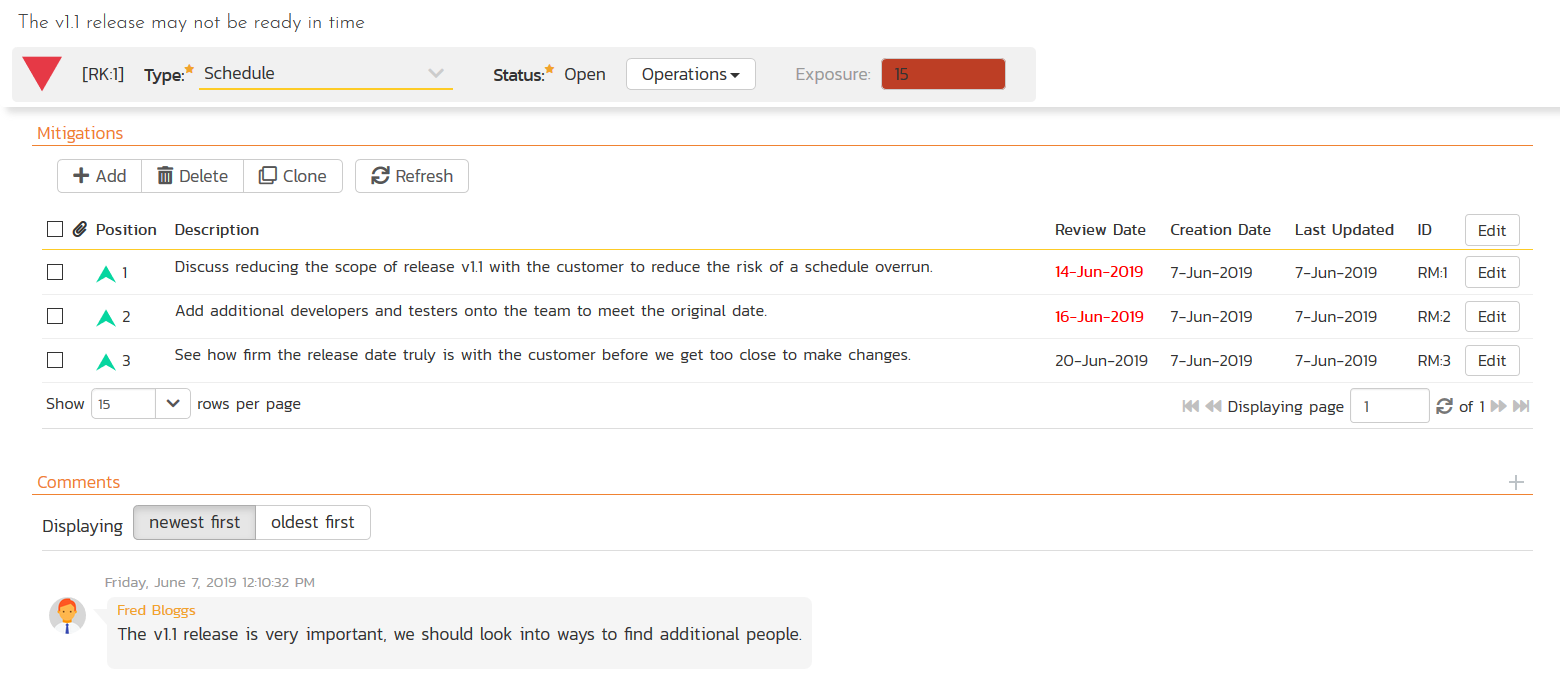
One of the key phases of Risk Management is identification and analysis of the mitigations that can reduce or eliminate the impact of the risk, should it happen. SpiraPlan provides built-in native support for adding and tracking the various mitigations to the risk, with the ability to specify individual review dates for each mitigation
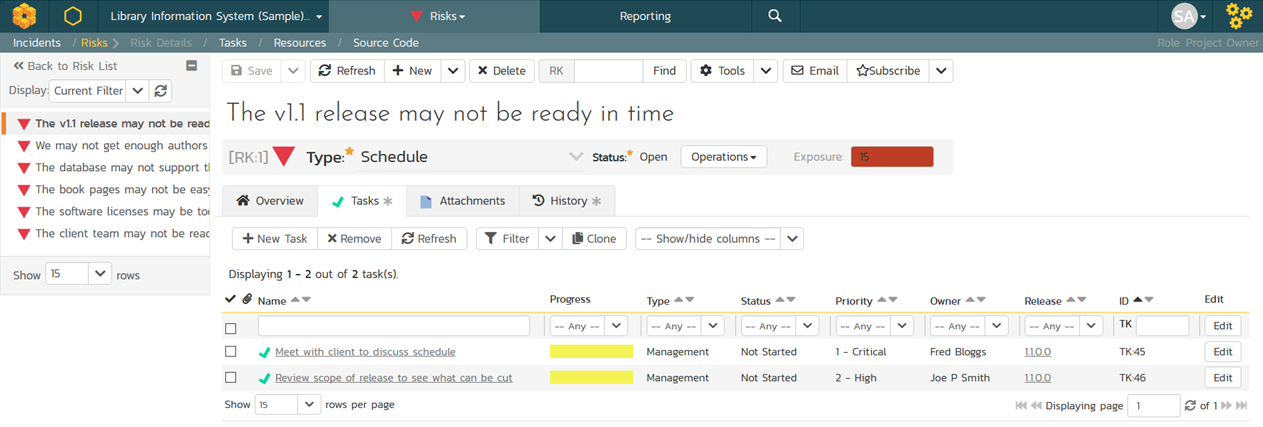
Further to that, as part of the Risk Treatment process, you can also create SpiraPlan project tasks to identify, prioritize and assign the specific activities that will need to be performed to successfully mitigate the risk. The mitigations and tasks are both tracked back to the parent risk.
Typically the Mitigations list is used to identify the ways that the risk can be addressed, whereas the tasks are the specific actions that different project members will need to take to act on the mitigations. The tasks have a status, priority, effort and date and will be visible in the standard SpiraPlan task lists and Kanban board.
Risk Audit Trail
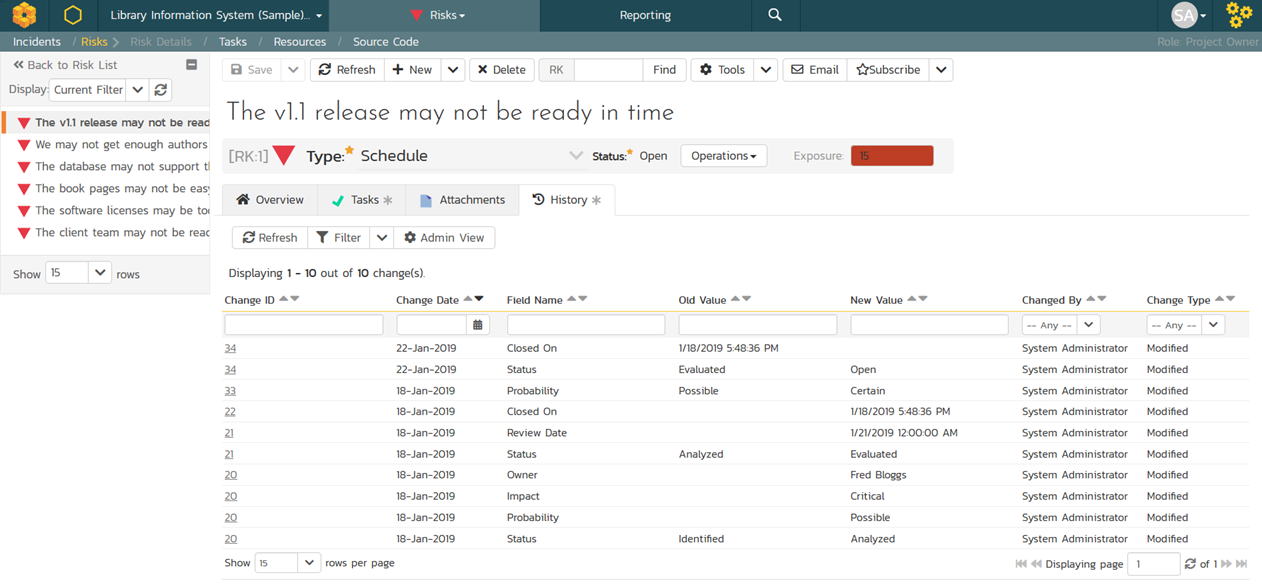
Using the built-in SpiraPlan history tracking feature, Risks also include a full audit trail of any changes made to the risk, for both standard and custom fields:
In addition, when you make changes to the status of the Risk, moving it through the risk management workflow, the system will enforce rules such as the need to add comments, add mitigations, specify the probability and/or impact:
The risk workflow operations also support electronic signatures for those customers that need to maintain a validated system.
Risk Associations
SpiraPlan lets you link risks with other artifacts in the system. For example, you have a new feature that you plan on implementing, and you need a way to capture and track all the risks associated with it. Alternatively, you may want to associate a risk with a test case that will be used to test the likelihood of a risk occurring.
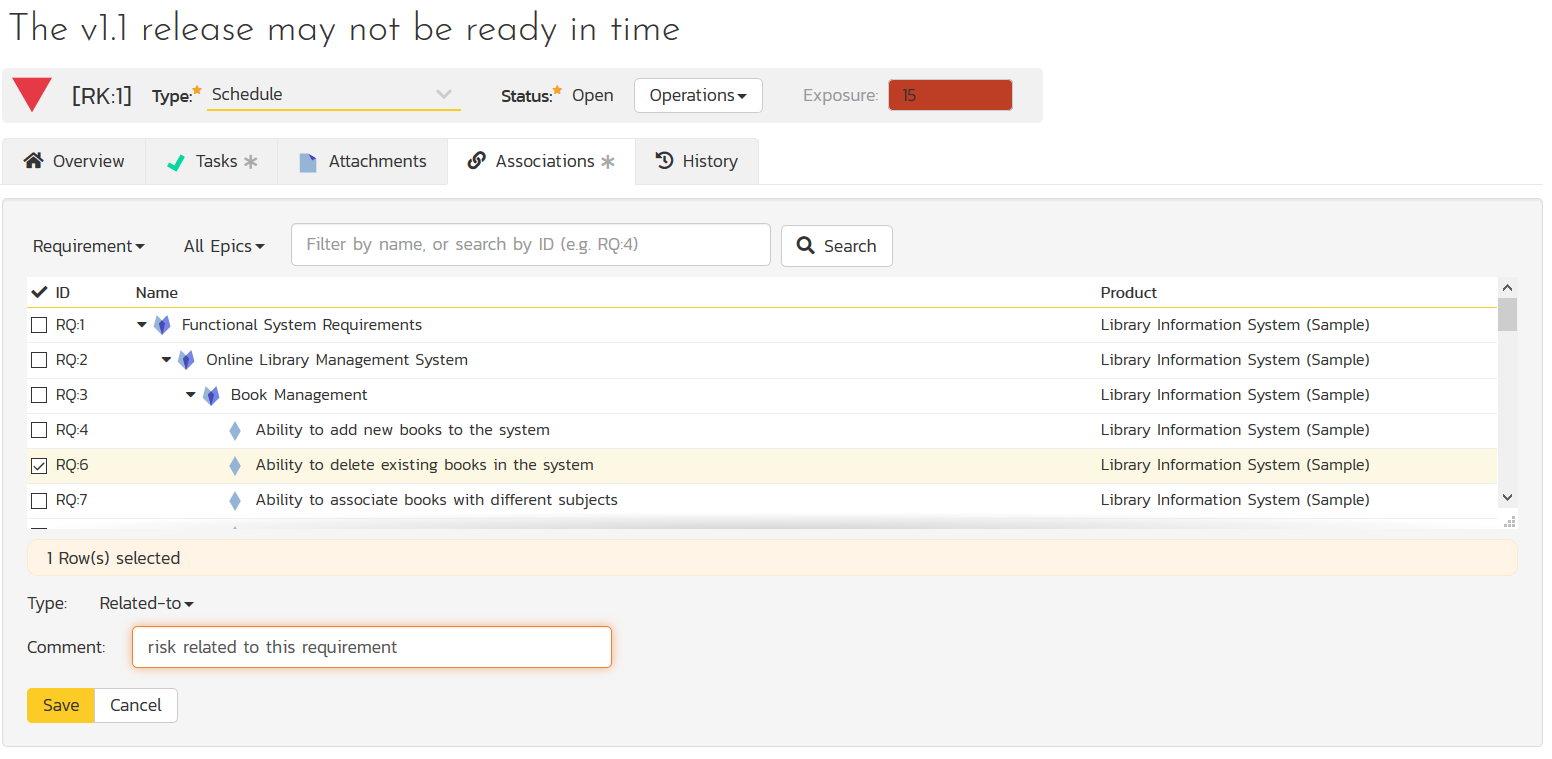
The associations tab on each risk page lets you link risks to other artifacts in the system.
Each association will contain the type of artifact being linked to, whether it is dependency, or simple relationship association, the date it was created, who made the association, and whether it is a cross-product association or not.
Risk Reporting and Risk Cube
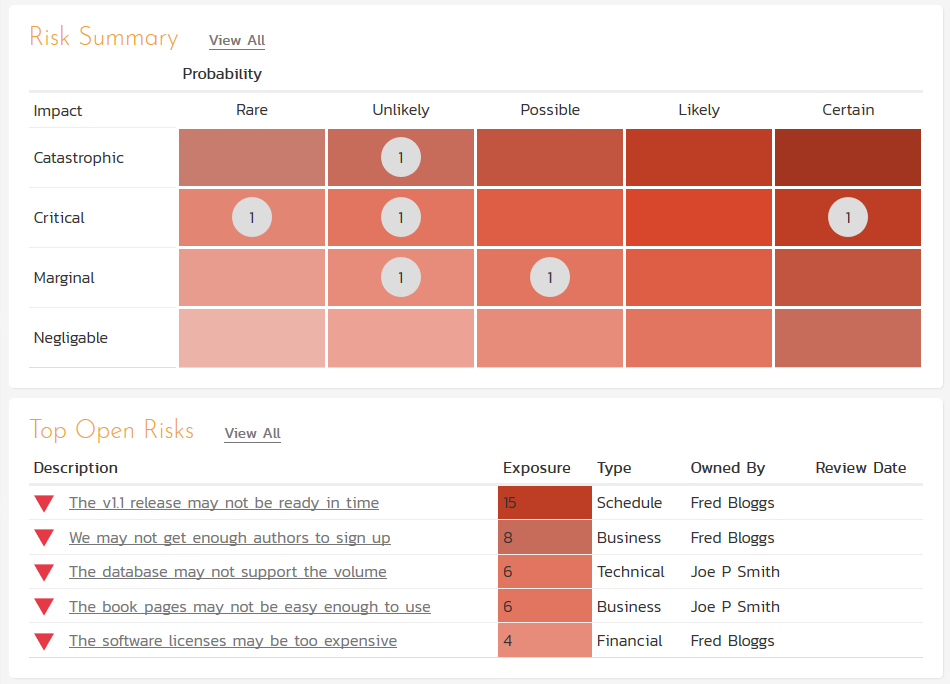
One of the key aspects of risk management is the ability to display the risks to management to ensure that they are adequately understood and that appropriate mitigations are in place. To make this easier, the SpiraPlan project dashboards include two risk widgets:
- A risk register that lists the most important risks (measured by their composite exposure score)
- A risk cube that displays a colored matrix of risk probability vs. impact and plots the number of risks in each intersection. Clicking on a value will open up the main risk list page with the filters set to that intersection.
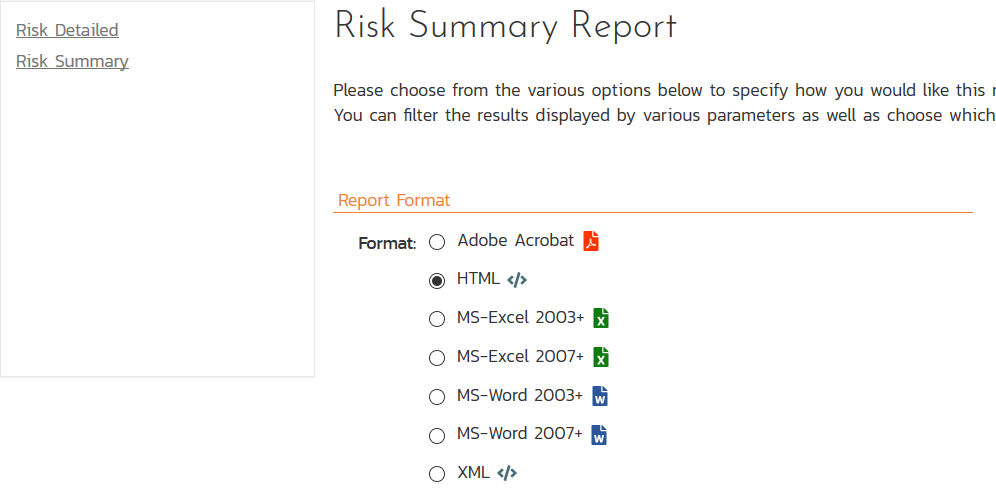
In addition, SpiraPlan includes a risk summary and risk detailed report in the standard SpiraPlan reporting menu that lets you generate risk reports in HTML, MS-Word, MS-Excel, PDF and XML formats:
Converting a Risk to an Issue
As we have discussed, a risk is used to describe a negative event that could happen in the future. What happens when that event actually materializes? In that situation, the risk has now occurred and should be converted into an issue that needs to be dealt with.
SpiraPlan comes with a free Risks+ plugin that can be installed from the SpiraApps marketplace. This plugin adds a button to the Risk page that lets you Move to Incident in a single click.
When you use this feature, SpiraPlan will automatically mark the Risk as Closed and grey out the various fields in accordance with the settings in your risk workflow. In addition, the risk’s exposure will be automatically converted to the highest one available (since it has now happened).
Simultaneously, SpiraPlan will create a new Incident in the system that will have the name, description, owner, tags, release and component set to the same values as in the original risk.
For traceability purposes, SpiraPlan will add an association link back to the original risk, with a comment describing that the risk has now been escalated into an issue.
Failure Mode & Effects Analysis (FMEA)
When looking at safety risks in manufacturing and hardware systems, the traditional risk management framework is extended to handle the additional concept of detectability, since if a risk is harder to detect, it makes it more important to manage.
When using an FMEA approach/methodology, there are actually three key measures:
- Probability - how likely the risk is to happen) on a numeric scale (e.g. 1-5)
- Impact - how severe the risk will be if that happens on a numeric scale (e.g. 1-5)
- Detectability - how easy it is to observe the risk on a numeric scale)
For those looking to use SpiraPlan for FMEA-based risk management, we have a free plugin available on the SpiraApps marketplace:
With this feature enabled, the Risk details page in SpiraPlan will show two additional fields - detectability (a dropdown the user can select) and RPN, a calculated integer field. When you change the values of probability, impact, or detectability, the FMEA plugin will automatically calculate the new value of RPN and display it:
If you go to the Product dashboard, you will be able to add a plugin widget to the dashboard, which will show the top product risks, ranked in order of descending RPN value. This is similar to the built-in Risk widget, except that it uses the RPN value (instead of Exposure) and uses a different customizable color-coding.
Since the FMEA plugin is product-specific, you can have some SpiraPlan products use the standard risk management functionality (e.g. for PRINCE2 support) and other products use the FMEA plugin to support manufacturing processes.
Try SpiraPlan free for 30 days, no credit cards, no contracts
Start My Free TrialAnd if you have any questions, please email or call us at +1 (202) 558-6885

