Confirming Data Setup
Let us first make sure that there are custom properties setup on the requirement artifact and that some of these custom properties have data.
- Let us set up two custom properties "Automatable" and "Contract Work" are set up as text properties.
- Let us add four requirements are added with data populated on the custom properties as follows.
| Requirement | Automatable | Contract Work |
| Requirement 1 | Present | Present |
| Requirement 2 | Present | Absent |
| Requirement 3 | Absent | Present |
| Requirement 4 | Absent | Absent |
The screenshot below shows the data set up.

Adding Logic in XSLT
- In the custom report that you are created, logic has to be introduced in the XSLT to check for data being present and insert them in the report only "if" data is present.
- Here is a snippet of that logic for just one custom property. You can see that if the custom property is not blank (!='' check), then a row is added to insert that data element. As a result, if the data is not present, a row is not inserted.
- This logic should be repeated for every custom property that needs to be checked.
<xsl:if test="CustomProperties/CustomProperty[Name = 'Custom_01']/Value !=''">
 <tr>
  <td width="20%">
	Automatable
  </td>
  <td>
	<xsl:value-of select="CustomProperties/CustomProperty[Name = 'Custom_01']/Value" disable-output-escaping="yes"/>
  </td>
 </tr>
</xsl:if>
Report Output
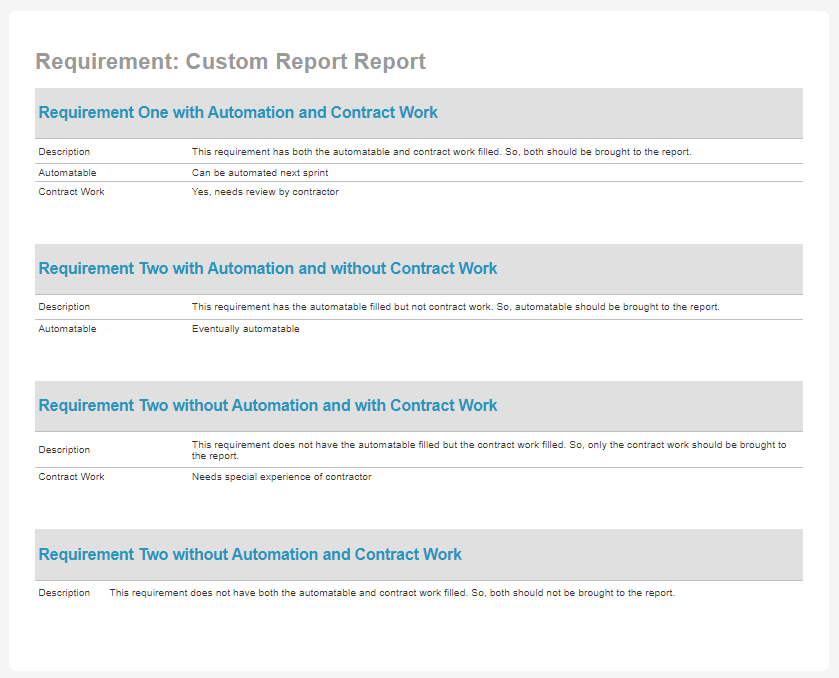
When this report is being run, the output looks as follows pulling the appropriate custom property when there is data present.