Setting Up the Workflow
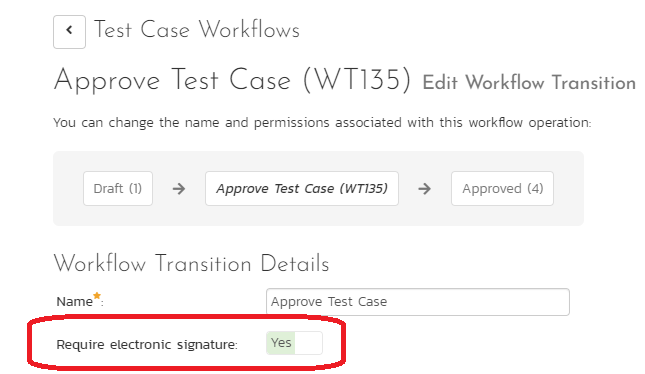
As a pre-requisite, let us ensure that the test case has electronic signature turned on. In this case, you can see that the "Test Case" workflow has the electronic signature turned on for the "Approve Test Case" transition that takes the test case from "Draft" to "Approved" state.
Creating the Custom Report
Then, do the following.
1. Go to Admin Panel
2. Edit Reports
3. Clone one of the reports (Say, "Test Case Detailed" report)
4. Delete the sections listed in the Standard Section
5. Name the report ("Test Case - Electronic Signature Report") so that it can be identified clearly when running the report
6. Update the header and footer as you see fit
7. Click on the "Add New Custom Section"
8. Give a name to the section (Required)
9. Add additional details in the header, footer, and description (optional)
10. Write the following Entity SQL Query (You can pick other fields from SpiraTestEntities.R_HistoryChangeSets if needed)
select
  R.ARTIFACT_DESC,
  R.CHANGE_DATE,
  R.USER_NAME,
  R.ARTIFACT_TYPE_NAME,
  R.SIGNATURE_HASH,
  R.MEANING
from
  SpiraTestEntities.R_HistoryChangeSets as R
where
  R.SIGNATURE_HASH IS NOT NULL and
  R.ARTIFACT_TYPE_NAME = "Test Case" and
  R.PROJECT_ID = ${ProjectId}
11. Preview Results. If things look good to you, click on "Create Default Template" to create the XSLT template. It should appears as follows:
<?xml version="1.0" encoding="utf-8"?>
<xsl:stylesheet version="1.0" xmlns:xsl="http://www.w3.org/1999/XSL/Transform" xmlns:msxsl="urn:schemas-microsoft-com:xslt" exclude-result-prefixes="msxsl">
  <xsl:template match="/RESULTS">
    <table class="DataGrid"><tr><th>ARTIFACT_DESC</th><th>CHANGE_DATE</th><th>USER_NAME</th><th>ARTIFACT_TYPE_NAME</th><th>SIGNATURE_HASH</th><th>MEANING</th></tr>
      <xsl:for-each select="ROW">
        <tr><td><xsl:value-of select="ARTIFACT_DESC"/></td><td><xsl:value-of select="CHANGE_DATE"/></td><td><xsl:value-of select="USER_NAME"/></td><td><xsl:value-of select="ARTIFACT_TYPE_NAME"/></td><td><xsl:value-of select="SIGNATURE_HASH"/></td><td><xsl:value-of select="MEANING"/></td>
        </tr>
      </xsl:for-each>
        </table>
    </xsl:template>
</xsl:stylesheet>
12. Hit the Save button to save the Custom Section.
13. Hit the Save button to save the Report.
Running the Report
14. Now, select the project you want to run this report, go to Reports, and click on the report you created (should be listed on the standard section on the left).
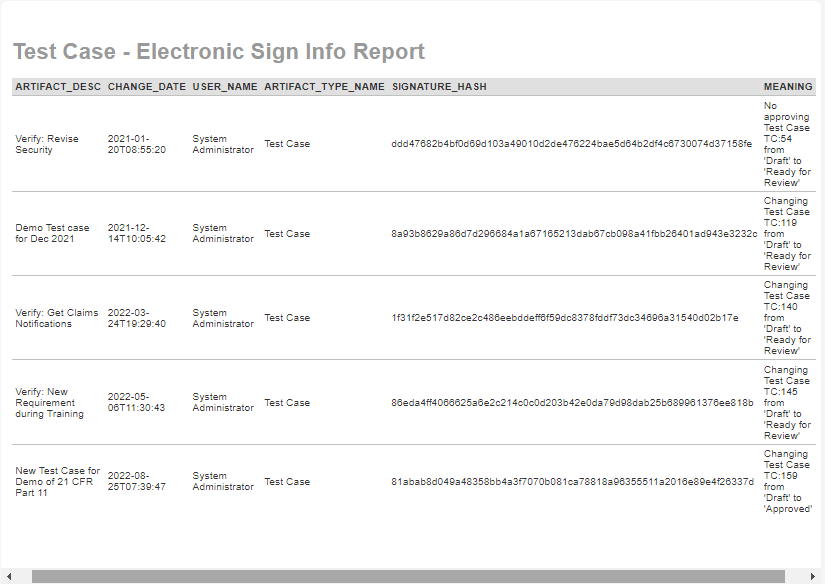
15. If you have data, it should appear as follows: