Setting up RemoteLaunch
Perform this procedure once per remote execution machine
This requires a separate license. Trial licenses are available. Local Admin privileges will be required, minimally, to unblock the test extention DLL.
- Download and launch the MSI file to install RemoteLaunch on the computer that will serve as the remote execution agent.
- Note the installation path as it will be needed when installing execution engines.
- Default path: C:\Program Files (x86)\Inflectra\Spira RemoteLaunch
- Download the CommandLine test extension.
- https://www.inflectra.com/SpiraTeam/Downloads.aspx#TestAutomation

- Copy the DLL from CommandLineEngine.zip to the \extentions folder under the RemoteLaunch installation path.

- Note that RemoteLaunch only detects installed extentions during launch.
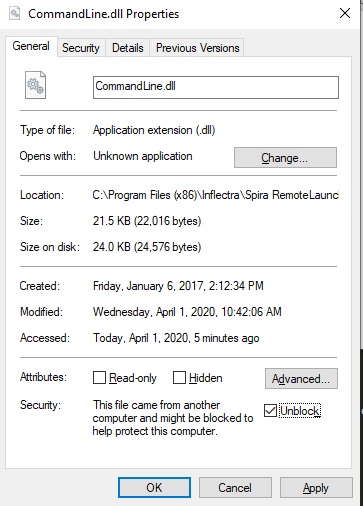
- Ensure Windows will not blocked the DLL by right-clicking on it, selecting Properties, and checking the Unblock box.

- Ensure the DLL's security settings include the "Read & execute" permission for Users and Administrators.
- Consider pinning RemoteLaunch to the Start Menu
- Update the RemoteLaunch license.
- Launch RemoteLaunch from the Start menu.
- Ignore warnings related to extentions not being found.
- When first launched, you will be prompted to update the license information. Note that RemoteLaunch is licensed separately from Spira.
- Fill in the Organization and License Key fields.
- Exit and relaunch RemoteLaunch. It should now launch and reside in the systray.
- If any warnings are issued during re-launch, resolve the issue before proceeding.
- Configure RemoteLaunch Client Setup.
- Right-click on the RemoteLaunch icon and select Configuration.
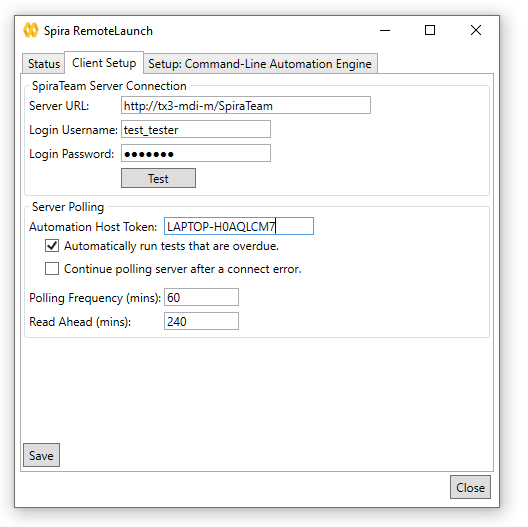
- Select the Client Setup tab and populate all fields.
- Be sure to test the SpiraTeam connection once the URL and login credentials have been entered.
- Be sure to change the default Automation Host Token. This will be needed when configuring automated tests in Spira.
- Use something descriptive and UNIQUE!
- Why not just use the computer name?
- From CMD prompt: echo %computername%

- Click Save. The Save button will be greyed out if no changed are pending.
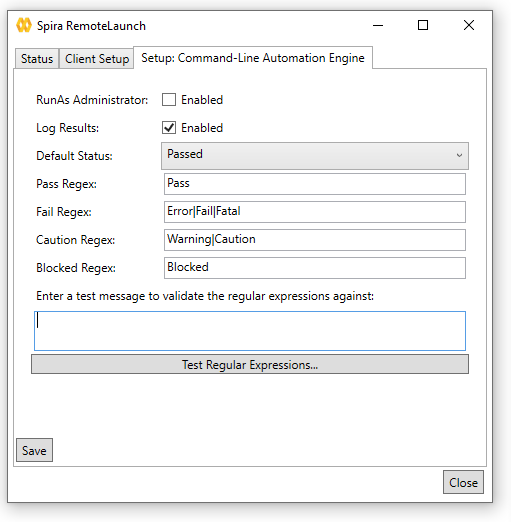
- Switch to the "Setup: Command-Line Automation Engine" tab.
- Notice the RunAs Administrator checkbox. Enable it only if required by the scripts to be executed.
- The remaining defaults are fine as-is.

- If any changes were made, click Save.
- Switch back to the Status tab.
- Click Force Poll. The Next Update counter should be reset to 00:00:59:59 (assuming the polling frequency was set to 60 minutes.)
- If polling was not successful, resolve the issue before proceding.
- Click Close. RemoteLaunch will minimize to the systray and will still be running in the background.
- Client-side setup is now complete.
Setting up Command-Line Test Automation Engine
Perform this procedure once inside Spira.
- Enable Command-Line engine.
- Log into Spira as an Administrator.
- From the System: Admin Home screen, Navigate to Test Automation (under Integration)
- Click Edit on the Command-Line engine.
- If it is not present, click Add and complete the form as follows:
- Name: Command-Line
- Description: Engine that will execute a generic command-line executable
- Token: CommandLine
- This the one entry to get exactly right!
- Active: Yes
- Click Insert
- Set Active to Yes.
- Click Save.
- Add new Document Types
- Add a new Document Type for each type of command line script, such as PowerShell.
- Administration >> Documents >> Type
- Consider creating a "code review" approval workflow.
- Automated Test Scripts often rely on separate files that contain additional library functions or configuration data. Since each Document Type can be associated with a Workflow, consider creating a Document Type for managing script configuration.
- Document Types are not the same was MIME types! There is no need to create a Document Type for every possible type of file that will be managed by Spira.
- Add Document Folders.
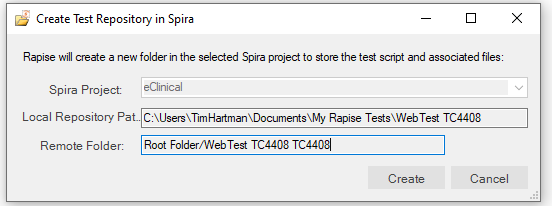
- If using Rapise with Spira, new tests are created off the Root.

- For Command-Line scripts, create a new folder off the root for each type of command line script, such as PowerShell.
- Create any additional subfolders needed to group scripts together logically. Perhaps mirror the Test Case folder structure?
Perform this procedure once per Automation Host per Spira Product
Don't bother adding Automation Hosts to a Template. The hosts do not appear in existing template-linked Products, nor do they appear in new template-linked Products.
- Log into Spira and select a Product or Product Template.
- Navigate to Automation Hosts (from the Artifacts drop-down.)
- Click New Host.
- Enter a Name (display name) and the exact Token specified during RemoteLaunch client configuration.
- Click Save.
Creating PowerShell-based Automated Test Cases
Perform this once per Automated Test Case
You have a choice of attaching or linking a script.
- "Attached" refers to entering (presumably via copy/paste) the script code directly into the Spira Test Case UI. This will result in a new Document being created and is appropriate for smaller script that are self-contained.
- "Linked" refers to using a script that was uploaded as a Document. This method is appropriate for more complex scripts that require external files.
Attached Method
- Spira will create a new Document containing the script. If the script requires supporting files, consider first creating a new Document folder with the same name as the Test Case.
- Navigate to Test Cases and select the appropriate parent Test Case folder.
- Create a new Test Case
- Click New Test Case
- Enter a Name and select a Test Case Type such as "Unit" or "Functional".
- Do not confuse this with Document Type.
- Click Save.
- Add Automation details.
- Click on the Name of the new Test Case.
- There is no need to create Test Steps.
- Scroll down to the Automation section.
- Select "Command-Line" from the Automation Engine drop-down.
- Enter a new Filename. This is a bit deceptive as it actually refers to the execution engine executable and parameters.
- powershell.exe should exist in the remote test execution machine's default path. If not, the path to the PowerShell executable can be determined by launch PowerShell and entering $PSHOME

- The token "${filename}" will be substituted for the name of the script file downloaded from Spira by RemoteLaunch and is therefore is a required element.
- powershell.exe only processes script files that have a file extension of .ps1, but Spira sends the script to RemoteLaunch as a .txt file. Fortunately, there is an easy workaround!
- Here is the correct Filename to use for PowerShell scripts:
- powershell.exe | -command Invoke-Expression $([System.IO.File]::ReadAllText('{filename}'))
- So PowerShell is told to invoke a command as opposed to a file
- The command is Invoke-Expression which allows PowerShell to execute code within a string.
- The string to be executed is being populated via the ReadAllText
- Accept the default Version of 1.0
- Select a Document Type such as "PowerShell Script".
- Select a Document Folder.
- Click Edit Parameters and create each input parameter expected by the script.
- Paste the script code into the Test Script textbox.
- In PowerShell, Test Case parameters can be consumed using Tokens.
- $Param1="${Param1}" $Param2="${Param2}"
- Once defined, the variables are used normally.
- $ParamLength
- Example:
# Parameter values are being set via Test Case parameters.

$Param1="${Param1}"

$Param2="${Param2}"

Start-Sleep -seconds 3

Write-Output ("Test Passed.  Param1 = {0}, PowerShell version: {1}" -f $Param1, (Get-Host).Version.ToString())

Write-Output (" Param2 = {0}, PowerShell location:{1}" -f $Param2, $PSHOME)- Save the Test Case.
- If necessary, go through the Workflow steps required to move the Test Case to the "Ready for Test" status.
Linked Method
- Place the script and any supporting files on the remote test execution machine or a network share accessible by the host.
- Navigate to Test Cases and select the appropriate parent folder.
- Create a new Test Case
- Click New Test Case
- Enter a Name and select a test Type such as Unit or Functional.
- Click Save.
- Add Automation details.
- Click on the Name of the new Test Case.
- There is no need to create Test Steps.
- Scroll down to the Automation section.
- Select "Command-Line" from the Automation Engine drop-down.
- Select a Script Type of Linked.
- This option can only be selected once Automation Engine is set to Command-Line.
- Enter a new Filename. This is a bit deceptive as it actually refers to the execution engine executable and parameters.
- powershell.exe should exist in the remote test execution machine's default path. If not, the path to the PowerShell executable can be determined by launch PowerShell and entering $PSHOME
- Specify the name and path of the script.
- Example:
- powershell.exe | -file "C:\scripts\hw.ps1" | -name "value"
- Click Edit Parameters and create each input parameter expected by the script.
- Here is how to add Command Line Arguments to a PowerShell script:
- param ( [string]$Param1 = 'P1_Default', [string]$Param2 = 'P2_Default')
- Save the Test Case.
- If necessary, go through the Workflow steps required to move the Test Case to the "Ready for Test" status.
Create a Test Set
- Navigate to Test Sets and select a Folder for the new Test Set.
- Click New Test Set.
- Enter a Name and any other needed properties such as Release.
- Click Save and click on the Name of the new Test Set.
- Select an Automation Host from the drop-down.
- Select a Recurrence value from the drop-down.
- Notable options include One Time, Hourly, and Daily.
- Fill in other fields such as Description and Owner as necessary.
- Scroll down to the Test Cases section and click Add.
- Select the appropriate folder or use the Search function to find the Test Cases to be added.
- Check the box next to each script to be added and click Save.
- Add additional Test Cases as required. You may select the same Test Case multiple times.
- For each Test Case, check the box next to the Test Case name and click Edit Parameters.
- If no parameter is specified, the default values from the Test Case will be used.
- Click Save.
Executing the Test Set
It's about time, right? Make sure RemoteLaunch is running on the Automation Host specified in the Test Set and click the Execute button at the top of the Test Sets screen.
There is also an Execute Tests button located in the Test Cases section of the Test Script, but this is for executing manual tests only. This is also the case for the Re-Run button within a Test Run.