This article describes how to add a custom Flex control support. This requires some engineering knowledge about how Flex controls work and how to use Adobe Flex Builder.
First of all, Adobe Flex Builder (version 3.2 and higher) is required.
- Launch Flex Builder
- Import Flex Adapter project. Generally it is done using File menu, but the exact way can differ from version to version of Flex Builder. It is File => Import Flash Builder Project in Flash Builder 4.6 for example.
- Open src => com => smartestudio.automation => AutomationGenericEnv.xml and scroll it to the last ClassInfo entry.
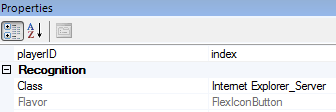
- Adding custom control is basically adding a ClassInfo entry into this xml file. Say, we want to add a new type of button - FlexIconButton:
<ClassInfo Name="FlexIconButton" Extends="FlexButton">
"Name" is the Flavor of control. It is shown as "Flavor" in Rapise. "Extends" is an optional field that specifies what flavor is extended by a newly created control. This works like usual OO inheritance - all the Events and Properties are inherited from parent to child.
- Next step is to specify all the Flex classes that implement this flavor:
<Implementation Class="widgets.Navigation::IconButton" />
Each ClassInfo entry can have any number above one of implementation classes.
- The next step is to add custom events (if any). Events are listed in the <Events> block, each event in its own <Event> element. Here goes an example:
<Event Name="Click" >
    <Implementation Class="flash.events::MouseEvent" Type="click"/>
    <Property Name="keyModifier"  DefaultValue="0">
        <PropertyType Type="Enumeration" ListOfValuesName="FlexKeyModifierValues" Codec="keyModifier"/>
    </Property>
</Event>
Name is the name of the event. This name is used in Rapise when an event is recorded.
<Implementation> element contains information about event implementation. Class and type are listed here.
Event can contain any number of parameters. These parameters are listed in <Property> element each. Name is the name of parameter and defaultValue (optional) contains the default value of parameter (this value is used when no property is specified). Each Property element should contain PropertyType element which describes the type of property. In this case type is Enumeration, list of values is "FlexKeyModifierValues" (these lists are defined in the end of the xml file) and Codec is "keyModifier". This is quite a complex case, usually it is enough just to specify type of the property.
Codec is a program module which specifies how to code and decode property value. Codecs are stored in codec folder of the FlexAdapter. The standart set of codecs is enough for the most of the cases, but if you are going to create your own codec, place it into this folder, add its file into the project and add initialization into FlexAdapter constructor.
- Properties have the same syntax as event parameters:
<Property Name="label" ForDefaultVerification="true" ForDescription="true" ForVerification="true">
   <PropertyType Type="String"/>
</Property>
The only exception is additional parameters: ForDefaultVerification, ForDescription and ForVerification. They are optional. FlexAdapter use these parameters to classify Properties for Verification, Description and DefaultVerification.
- Now save the xml file and rebuild the FlexAdpter project. Ensure build was successful and your flex application is linked with correct FlexAdapter.swc. Rebuild your app as well.
- Copy AutomationGenericEnv.xml into Engine\Lib\Common\Flex\ and launch GenFlexBehavior.js. This will update FlexActions.js and FlexProperties.js files corresponding to the modified xml.
- You can change an icon shown next to object in the Object Tree. Name it as <object flavor>.png and place it into Engine\Object Images folder. In our case it should be names as "FlexIconButton.png"
- Now the control is ready to be used. Check if it is recorded correctly and all the actions and properies you added do work properly as well.